

Share This Article
Launching a new website is an exciting milestone, whether you are starting a blog, setting up an e-commerce store, or establishing a personal portfolio. However, before you design pages or publish content, you need a web address where visitors can find you.
Learning how to buy your first domain name is the fundamental first step in building an online presence.
To beginners, the process can seem intimidating—terms like gTLDs, nameservers, WHOIS privacy, and DNS propagation are often thrown around without clear explanation. Fortunately, registering a domain name is straightforward when broken down step-by-step. In this comprehensive guide, you will learn everything about domain names, how extensions work, key tips for choosing the right name, and a complete walkthrough of buying and configuring your first domain.
What Is a Domain Name?
A domain name is the human-readable web address that visitors type into their browser’s address bar to access your website.
Every website on the internet is hosted on a server identified by a numerical IP (Internet Protocol) address, such as 192.168.1.1. Because long strings of numbers are difficult for human memory, the Domain Name System (DNS) was created to translate complex numeric IP addresses into memorable, brandable words like google.com or yourbrand.com.
Think of your website as a physical house:
- Web Hosting is the actual land and structure where your content resides.
- Domain Name is the street address that tells visitors exactly where to find your home.
Essential Tips for Choosing the Perfect Domain Name
Your domain name forms the cornerstone of your brand identity online. Changing it later can harm your search engine rankings and confuse your audience. Keep these guidelines in mind when picking your domain:
- Avoid Numbers and Hyphens: Hyphens (
-) and numbers (1,2,3) lead to misunderstandings when spoken aloud. For example, visitors won’t know if “5” should be spelled out as “five” or typed as a digit. - Keep It Short and Easy to Type: Aim for 2 to 3 concise words. Short domain names are easier to remember, reducing typo-driven traffic loss.
- Avoid Trademarked Names: Never use existing brand names or registered trademarks in your domain (e.g.,
apple-tech-reviews.com). Doing so risks legal notices, domain forfeiture, or costly legal battles. - Make It Brandable and Scalable: Choose a name flexible enough to grow with your business. A domain like
bestshoereviews.comlimits you if you expand into activewear later. - Use Domain Generators for Brainstorming: If your ideal name is already taken, tools like Namecheap Domain Name Generator or Lean Domain Search can help generate available, creative alternatives.
Understanding Domain Extensions (TLDs)
The suffix at the end of your domain name (such as .com, .org, or .tech) is known as a Top-Level Domain (TLD) or domain extension. Domain extensions fall into three main categories:
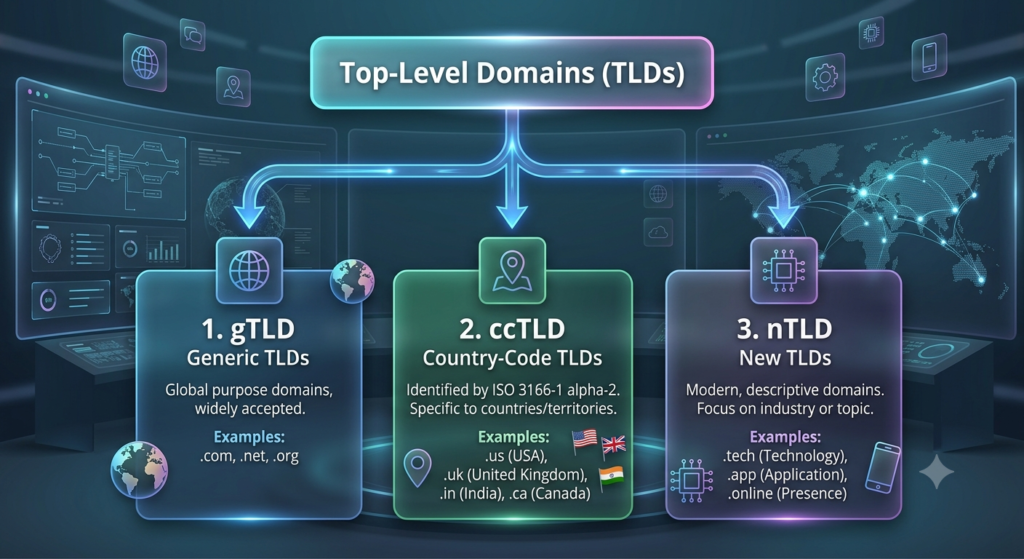
1. Generic Top-Level Domains (gTLD)
These are the most traditional and widely recognized extensions on the internet:
.com(Commercial): The universal standard for businesses and personal sites..org(Organization): Typically used by non-profits, open-source projects, and communities..edu(Education): Reserved exclusively for accredited educational institutions.
2. Country-Code Top-Level Domains (ccTLD)
Country-code extensions use two-letter combinations reserved for specific countries or geographical regions:
.in(India).uk(United Kingdom).ca(Canada).us(United States)
Using a ccTLD signals local relevance to search engines, making it effective for businesses focusing primarily on a regional audience.
3. New Top-Level Domains (nTLD)
To address the scarcity of available .com domains, hundreds of creative, industry-specific extensions were introduced:
- Examples:
.tech,.store,.media,.ninja,.agency,.pizza
Do New Domain Extensions (nTLDs) Impact SEO?
A common concern for beginners is whether using a non-traditional extension like .tech or .online hurts search rankings. According to Google Search Central, Google treats all TLDs equally for crawl, index, and ranking purposes. While a .com extension carries higher baseline trust from casual users, an nTLD will not penalize your search performance.
What Is a Domain Registrar?
A Domain Registrar is an officially accredited organization that manages the reservation and assignment of internet domain names under the supervision of ICANN (Internet Corporation for Assigned Names and Numbers).
Popular, reliable domain registrars include:
- Namecheap
- GoDaddy
- Cloudflare Registrar
- Domain.com
- Dynadot
Important Concept: You never technically “own” a domain name permanently in perpetuity. Instead, you rent or lease the rights to use the domain name for set periods (ranging from 1 to 10 years). To keep control of the address, you must pay an annual renewal fee prior to your domain’s expiration date.
How to Buy Your First Domain Name (Step-by-Step Walkthrough)
To demonstrate the step-by-step checkout and registration process, we will walk through registering a domain using Namecheap, one of the most widely used and budget-friendly domain registrars. The underlying procedure remains nearly identical regardless of the domain registrar you select.
Step 1: Create an Account on the Domain Registrar
Visit your preferred domain registrar (e.g., Namecheap) and click on Sign Up or Create Account. Enter your basic registration details, including your full legal name, email address, username, and a strong password.
Step 2: Log In and Locate the Search Bar
Once your account is verified and active, log in. Navigate to the main domain search page or the homepage search bar.
Step 3: Search for Your Desired Domain
Type your preferred domain name into the search bar (e.g., mybrandnewsite.com) and click Search.

The system will check real-time availability across global DNS registries.
Step 4: Review Availability and Add to Cart
- If Available: You will see a confirmation along with the annual registration price. Click Add to Cart.
- If Not Available: The registrar will suggest alternative domain extensions (such as
.net,.co, or.org) or variations. If your core name is taken, tweak your wording or test a different extension before adding it to your cart.
Step 5: Skip Unnecessary Upsells
During checkout, registrars frequently offer optional add-ons, such as web hosting, website builders, paid SSL certificates, or specialized email marketing software.
Pro Tip: Pass on these initial add-ons during domain registration. You can purchase web hosting or specialized services separately later, often at better rates or superior service quality.
Step 6: Understand the Mandatory ICANN Fee
On your order summary, you will notice a small fee added to your total (typically around $0.18 per year). This mandatory fee is charged directly by ICANN to fund administrative oversight of global domain allocation.
Step 7: Select Registration Tenure and Configure Privacy Settings
On the review page, configure the following core settings:
- Registration Duration: Choose how many years you wish to register the domain for (1 to 10 years).
- Auto-Renew: Enabling Auto-Renew prevents accidental domain expiration and domain loss. If you are building a long-term brand, leave Auto-Renew turned ON.
- WHOIS Privacy Protection (WhoisGuard): Public WHOIS databases list the personal address, email, and phone number of every domain owner. Free WHOIS privacy protection masks your personal personal details with proxy data, protecting you from spam calls, phishing, and unwanted solicitors. Ensure WHOIS Privacy is toggled ON.
- Premium DNS (Optional): Premium DNS provides improved uptime guarantees and faster global resolution through secondary redundancy networks. For brand-new websites, standard free DNS is sufficient.
Step 8: Complete Payment Information
Proceed to the payment page and input your credit/debit card, PayPal, or supported digital wallet details.
Note for International Buyers: Many domain registrars process transactions internationally in USD. Ensure your payment card has international transactions enabled with your bank prior to checking out.
Step 9: Review and Confirm Order
Review your domain spelling, tenure duration, and final bill total. Click Pay Now or Confirm Order. Once the transaction processes, you will receive a registration receipt via email and access to your registrar management dashboard.
Post-Purchase Setup: Linking Domain to Web Hosting
Purchasing the domain name is only half the equation; you now need to connect your domain to your web hosting provider so visitors can view your site.
1. Changing Nameservers (DNS Configuration)
Nameservers tell the internet where your website files are hosted. When someone types your domain into a browser, the nameservers translate that request and send it to your hosting server.
- Log into your domain registrar dashboard and find your Domain List.
- Click Manage next to your newly registered domain.
- Locate the Nameservers setting (default is usually set to Registrar DNS).
- Select Custom DNS.
- Copy the custom nameserver records provided by your web host (e.g.,
ns1.yourhost.comandns2.yourhost.com) and paste them into the input fields. - Click Save / Apply.
DNS Propagation Notice: Changes to nameservers do not update globally instantly. It typically takes between 2 to 48 hours for full DNS propagation to complete worldwide.
2. Setting Up Professional Email Forwarding
Most registrars offer free Email Forwarding (email aliases). This feature lets you create professional addresses without paying for a full Google Workspace or Microsoft 365 inbox.
For example, you can create aliases like:
info@yourdomain.comsupport@yourdomain.com
Any messages sent to these aliases automatically forward straight to your existing personal email address (such as your personal @gmail.com).
Note: Email forwarding allows you to receive messages at a custom domain address, but replying directly will show your primary personal email unless you configure SMTP outbound settings.
Comparison: Domain Registration Feature Summary
| Feature | Description | Recommendation for Beginners |
| Domain Tenure | Duration of initial domain rental (1-10 years) | 1-2 years initial term |
| Auto-Renew | Automatically charges card before domain expires | Enable for main domain |
| WHOIS Privacy | Conceals personal contact info from public WHOIS database | Must be enabled (Free on top registrars) |
| Custom Nameservers | Directs domain traffic to external hosting account | Set to hosting provider DNS |
| Email Forwarding | Routes domain alias emails to a primary inbox | Enable for business queries |
Summary & Next Steps
Buying your first domain name is an accessible and affordable process. By choosing a clear, brandable name without special characters, selecting an appropriate TLD, protecting your personal data with WHOIS privacy, and correctly pointing your custom nameservers to your web host, you set a solid foundation for your online presence.
Once your domain registration and DNS propagation are complete, your next steps are to install a Content Management System (like WordPress), configure an SSL certificate for security (HTTPS), and begin publishing content.
